This post may contain affiliate links. As an Amazon Associate, the site earns from qualifying purchases at no extra cost to you.
Making homemade soap doesn’t have to involve complicated chemistry or intimidating equipment. With the melt-and-pour method, creating beautiful, natural soap bars at home is approachable, safe, and surprisingly satisfying. This step-by-step guide walks through how to make DIY melt-and-pour soap with essential oils, simple tools, and customizable add-ins—perfect for beginners, handmade gifts, or elevating everyday routines.
Putting together a thoughtful gift? This creative gift wrapping article makes a beautiful companion project.
What You’ll Need: Soap-Making Supplies and Tools
Getting organized first makes the entire process smoother. Everything listed below is beginner-friendly and easy to find online or at craft stores.
*You don’t need everything on this list to get started—just a basic soap base, one essential oil, and a simple mold is enough for your first batch.
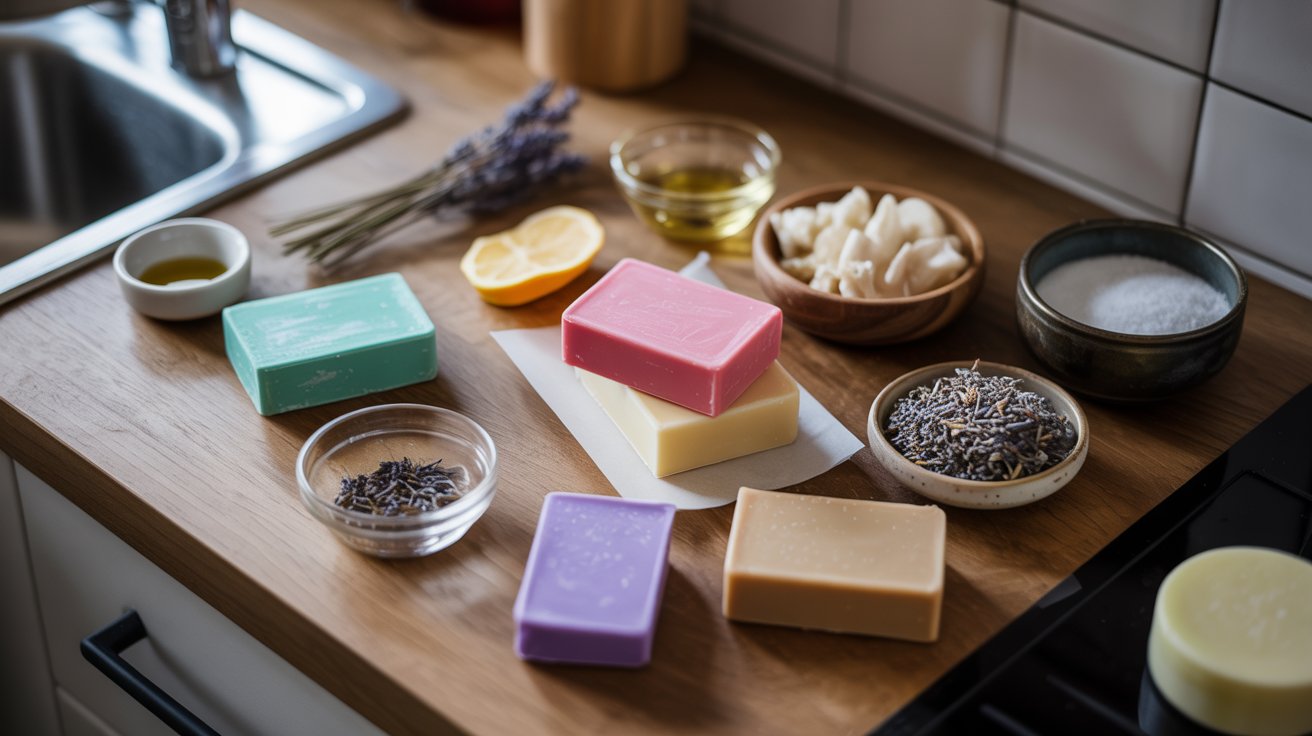
Soap Base (Batch: 10–16 oz, Purchase: 2–5 lbs recommended)
Choose a melt-and-pour base such as goat’s milk, shea butter, honey, or clear glycerin. Creamier bases create softer, opaque bars, while clear bases work well for layered or decorative soaps.
For beginners, 2 pounds of soap base will make about 8–12 standard bars — a perfect intro amount. If you plan to make multiple batches or variety packs (layered or scented bars), 4–5 pounds gives you enough base without having to reorder mid‑project.
A typical batch uses 10–16 oz of base.

Essential Oils (Choose Your Scent Style)
Instead of guessing what blends well together, start with a simple scent direction and build from there. You can start with just one or two oils and experiment as you get comfortable.
If you’d like to skip the guesswork, these curated oil combos are a great place to start.
Fresh & Uplifting
Light, clean, and perfect for everyday use or morning showers.
Energizing & Invigorating
A refreshing blend that works especially well for wake-up routines or post-workout showers.
Calming & Spa-Like
Soft, herbal, and grounding—ideal for evening wind-down soaps.
💡 Tip: Start small—blend 1–2 oils at first, then expand as you gain confidence.
Optional Add-Ins (Customize Your Soap)
These are completely optional, but they can elevate your bars and add a professional touch:
- Vitamin E oil (¼ tsp) for conditioning and oil stability
- Skin-safe mica powders for color
- Honey for added moisture
- Finely ground oats, coffee grounds, or sea salt for exfoliation
- Dried botanicals for surface decoration
Tools
You don’t need fancy equipment to get started. Here’s what makes the process easier:
- Plastic wrap or shrink wrap for storage
- Heat-safe glass bowl or large glass measuring cup
- Sharp knife and cutting board
- Silicone spatula or wooden spoon
- Spray bottle with rubbing alcohol
- Cooling rack and parchment paper
Step 1: Prep and Melt the Soap Base
Start with a clean, dry workspace. Chop the melt-and-pour soap base into small, evenly sized cubes to ensure smooth melting.
Place the cubes into a heat-safe glass container and melt in the microwave using 30-second intervals, stirring gently between each round. Continue until the base is mostly liquid, then stir until fully smooth. Avoid boiling or overheating, which can affect texture and scent retention. The ideal temperature is below 160°F.
Pro Tip: Slower melting produces a clearer, smoother final bar and reduces air bubbles.

Step 2: Add Essential Oils, Color, and Conditioning Extras
Allow the melted soap base to cool slightly before adding fragrance. Essential oils are best added around 140–150°F to preserve their aroma.
Stir in essential oils gently, staying within recommended usage rates (e.g., a 1-pound batch, about 100-120 drops or 1 teaspoon of essential oil is a safe baseline). For balanced scents, blend oils separately before adding them to the soap base.
If using colorants, dissolve mica powders in a small amount of rubbing alcohol before adding. This prevents clumping and ensures even color. Add vitamin E oil and any other liquid additives last, stirring slowly to minimize bubbles.
Pro Tip: Letting the soap thicken slightly before adding heavier exfoliants helps keep them evenly suspended.
Step 3: Pouring and Setting the Soap
Lightly spritz soap molds with rubbing alcohol before pouring. This helps eliminate bubbles and ensures a smooth finish.
Pour the soap slowly into each mold cavity, filling to the top. Spray the surface lightly with alcohol to remove any remaining bubbles.
Allow the soap to set at room temperature for one to two hours. Refrigeration can speed this up, but freezing is not recommended.

Step 4: Unmolding and Curing
Once fully firm, gently release the soap from the silicone molds. Place bars on a cooling rack or parchment-lined surface and allow them to air-dry for about 24 hours. This step helps excess moisture evaporate, creating a harder, longer-lasting bar.
After curing, wrap the soap tightly to protect it from humidity and preserve fragrance.
Customization Ideas and Pro-Level Tips
Layered Soaps: Pour one color, allow a skin to form, spritz with alcohol, then add the next layer to ensure adhesion.
Swirls: Pour two colors together and gently swirl with a skewer for a marbled effect.
Decorative Tops: Press dried botanicals onto the surface right after pouring rather than mixing them in.
Base Selection: Clear bases work best for embeds and vibrant colors, while white or milk bases create soft, muted tones.
Essential Oil Safety for Soap Making
Even though melt-and-pour soap avoids lye, essential oils are highly concentrated and must be handled thoughtfully. Always dilute them fully into the soap base, verify safe usage limits, and avoid oils known to cause irritation unless used at very low, approved levels.
Store essential oils away from children and pets, work in a ventilated space, and keep oils away from open flames.
Final Notes
Melt-and-pour soap making offers a flexible, beginner-friendly way to create custom soap bars that look polished and feel intentional. With the right base, thoughtful fragrance choices, and simple tools, homemade soap becomes both practical and creative—ideal for personal use, gifting, or future small-batch projects.
Recreate This Project: Supplies & Tools
If you’d like to recreate this exactly or skip the guesswork, here are the supplies used in this guide.
Soap Bases (Choose Your Style)
- Goat’s Milk Melt-and-Pour Soap Base (creamy and moisturizing)
- Shea Butter Melt-and-Pour Soap Base (rich and nourishing)
- Honey Melt-and-Pour Soap Base (conditioning with a natural glow)
- Clear Glycerin Soap Base (perfect for layering and decorative designs)
Essential Oils
Starter Favorites (Easy to Blend)
Fresh & Clean Notes
Energizing Additions
Tools & Add-Ins
- Silicone Soap Molds
- Heat-Safe Glass Measuring Cup or Bowl
- Spray Bottle with Rubbing Alcohol
- Mica Powders for Soap Color (Cosmetic‑grade, finely milled pigments that blend smoothly for vibrant colors in melt‑and‑pour soap)
- Vitamin E Oil (Vitamin E oil is usually very thick and concentrated, so a tiny amount goes a long way—just a couple of drops in your soap base is enough to help with conditioning and stability.)
- Kitchen Scale