
This post may contain affiliate links. As an Amazon Associate, this site earns from qualifying purchases at no extra cost to you.
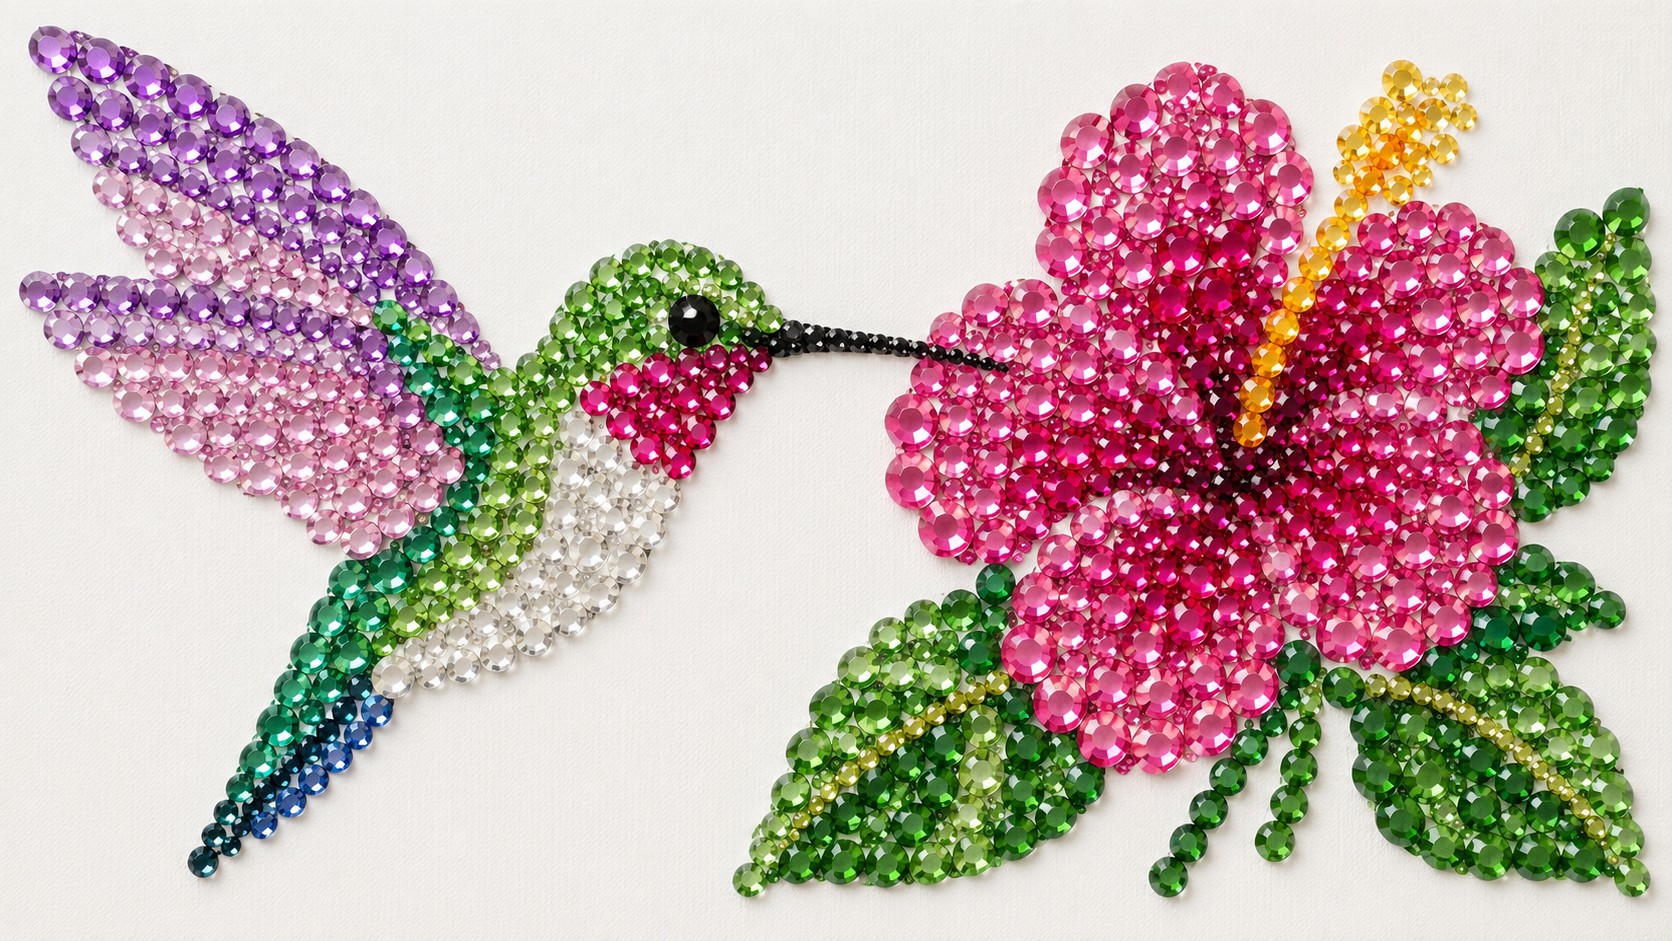
If you’ve ever admired sparkling wall art and wondered if you could create it yourself, DIY rhinestone canvas art is a fun and surprisingly beginner-friendly place to start. Unlike traditional painting, this craft uses flatback rhinestones to add shimmer, texture, and dimension to a canvas, allowing you to create everything from simple floral designs to bold modern artwork.
One of the reasons rhinestone canvas art has become so popular is that it doesn’t require years of artistic experience. Whether you enjoy crafting on weekends, making handmade gifts, or decorating your home on a budget, you can create beautiful pieces with just a few basic supplies and a little patience.
In this guide, you’ll learn everything you need to know about making your own rhinestone art canvas, including the materials you’ll need, the best glue for rhinestones on canvas, how to apply the rhinestones, whether you should seal your finished artwork, and tips for avoiding common beginner mistakes. By the end, you’ll have the confidence to create a sparkling canvas that’s uniquely your own.
What Is Rhinestone Canvas Art?
Rhinestone canvas art is a decorative craft that uses flatback rhinestones to create colorful images and designs on a canvas. Instead of applying paint with a brush, you carefully attach individual rhinestones using a strong adhesive, building your artwork one sparkling piece at a time.
The finished result catches the light beautifully, giving your project a dimensional, almost jewel-like appearance. Depending on the colors, sizes, and placement of the rhinestones, your artwork can look elegant, whimsical, modern, or even glamorous.
One of the biggest advantages of DIY rhinestone canvas art is that you start with a blank canvas instead of a preprinted pattern. That means you can create almost any design you like, from simple flowers and butterflies to personalized monograms and seasonal artwork. Popular choices include flowers, butterflies, hearts, inspirational quotes, seasonal artwork, abstract patterns, and personalized monograms.
Because you choose the design, colors, and placement, every project is completely unique.
Why Has Rhinestone Canvas Art Become So Popular?
One reason rhinestone canvas art has become such a popular craft is that it’s both creative and approachable. You don’t need advanced painting skills to make something beautiful, and every project can be customized with your favorite colors, patterns, and designs.
It’s also an incredibly versatile craft. You can create everything from seasonal decorations and personalized gifts to elegant wall art that complements your home décor. Because you’re designing the artwork yourself, no two projects ever have to look alike.
Many crafters also enjoy the slow, repetitive process of placing each rhinestone. It turns the project into a relaxing creative activity while producing a finished piece that’s both eye-catching and uniquely personal.
Why Beginners Love It
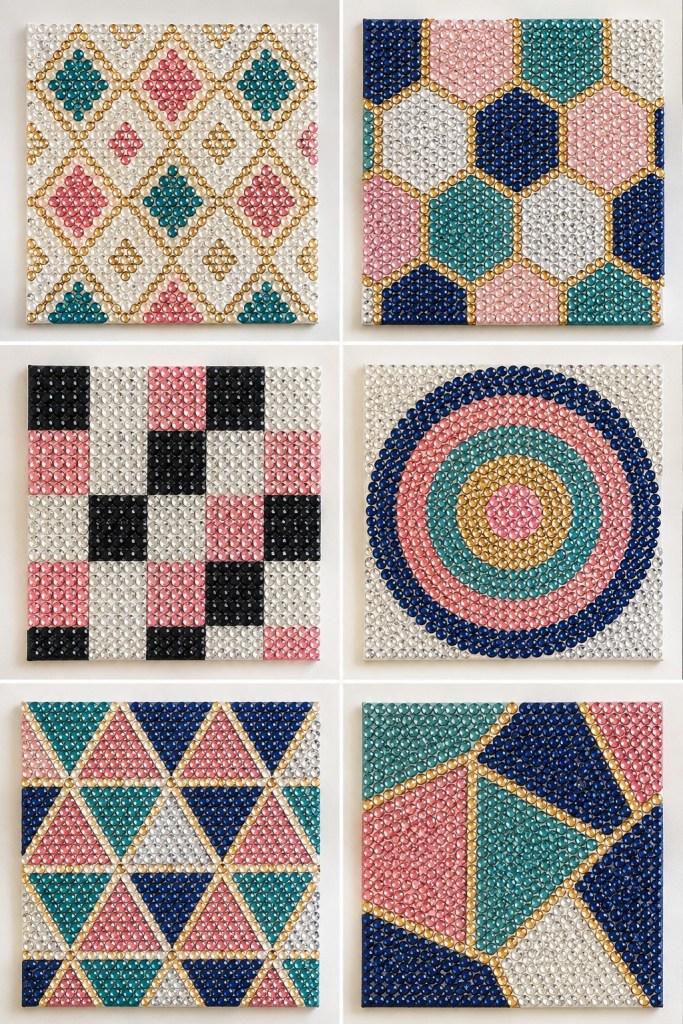
If you’re new to crafting, rhinestone art canvas projects are approachable because you don’t need advanced drawing or painting skills. Even simple shapes can look impressive once they’re covered in sparkling rhinestones.
Many first-time crafters begin with:
- Simple flowers
- Hearts
- Initials
- Butterflies
- Basic geometric patterns
As your confidence grows, you can move on to larger, more detailed designs with layered colors and intricate patterns.
Beginner Tip: Start with a smaller canvas, such as 8 x 10 inches, so you can learn the technique without feeling overwhelmed.
Rhinestone Canvas Art vs. Diamond Painting: What’s the Difference?
If you’ve been researching this craft, you’ve probably noticed that diamond painting often appears alongside rhinestone canvas art in search results. While the two crafts look similar at first glance, they’re actually quite different in how they’re created and the amount of creative freedom they offer.
Understanding the differences will help you choose the project that’s right for you.
| Feature | Rhinestone Canvas Art | Diamond Painting |
|---|---|---|
| Canvas | Blank or self-designed canvas | Preprinted adhesive canvas |
| Design | Completely customizable | Predetermined design |
| Rhinestones | Flatback rhinestones | Resin drills (diamond beads) |
| Creativity | High | Moderate |
| Best For | Original artwork and home décor | Following a printed pattern |
What Is Diamond Painting?
Diamond painting is a craft kit that comes with a preprinted adhesive canvas marked with symbols. Each symbol corresponds to a specific color of resin “diamond” drill, and you simply place the matching pieces onto the sticky surface until the picture is complete.
Because everything is planned for you, diamond painting is ideal for people who enjoy following a pattern without having to create their own design.
What Makes Rhinestone Canvas Art Different?
With rhinestone canvas art, you’re the designer.
You can start with a blank canvas, sketch your own artwork, trace a favorite design, or paint a colorful background before adding rhinestones. You’re free to choose:
- The image
- The layout
- The rhinestone colors
- The size of the stones
- The overall style
That creative flexibility is one of the biggest reasons many crafters eventually move from diamond painting to rhinestone canvas art.
Instead of recreating someone else’s design, you’re creating something that’s completely your own.

Which Is Better for Beginners?
Both diamond painting and DIY rhinestone canvas art are beginner-friendly, but they offer different creative experiences.
If you enjoy following a pattern with everything planned for you, a diamond painting kit is an excellent place to start. If you’d rather create original artwork and choose your own colors, designs, and layout, rhinestone canvas art gives you much more creative freedom.
Now that you understand the differences, let’s look at the supplies you’ll need to create your first rhinestone canvas art project.
Materials Needed for DIY Rhinestone Canvas Art
Before you begin your first DIY rhinestone canvas art project, gathering the right supplies will make the entire process easier and more enjoyable. The good news is you don’t need a large craft room or expensive equipment. A handful of quality materials is all it takes to create beautiful, sparkling artwork.
If you’re just starting out, focus on the essentials first. You can always expand your collection as you take on more detailed projects.
DIY Rhinestone Canvas Art Supply Checklist
| Supply | Why You Need It | Beginner Friendly |
|---|---|---|
| Blank stretched canvas | The base for your artwork | ✓ |
| Flatback rhinestones | Creates the sparkling design | ✓ |
| Rhinestone glue | Holds the rhinestones securely | ✓ |
| Wax pencil or rhinestone picker | Makes placing rhinestones much easier | ✓ |
| Precision tweezers | Adjusts and straightens rhinestones | ✓ |
| Sorting tray | Keeps rhinestones organized | ✓ |
| Acrylic sealer (optional) | Protects finished artwork | Optional |
Blank Canvas
A quality canvas provides the foundation for your artwork. Most beginners find an 8 x 10-inch or 11 x 14-inch stretched canvas easy to work with because it offers enough space for a detailed design without feeling overwhelming.
White canvases are the most versatile, while black canvases create dramatic contrast and make colorful rhinestones stand out even more.

Flatback Rhinestones
Unlike pointed-back rhinestones used in jewelry, flatback rhinestones are designed to be glued onto flat surfaces like canvas.
They come in a wide variety of colors, finishes, and sizes, including:
- Acrylic
- Resin
- Glass
- Metallic
- Pearl
- Aurora Borealis (AB)
- Iridescent
For your first rhinestone art canvas, acrylic or resin rhinestones offer the best balance of affordability, durability, and sparkle.
Rhinestone Glue
A strong adhesive is essential for keeping your design intact over time. The best glue for rhinestones on canvas dries clear, creates a secure bond, and gives you enough working time to position each rhinestone accurately.
We’ll compare the most popular adhesives in the next section so you can choose the right one for your project.

Wax Pencil or Rhinestone Picker
A wax pencil makes picking up individual rhinestones quick and effortless. Instead of struggling with your fingertips, simply touch the wax tip to a rhinestone and place it exactly where you want it.
For beginners, this inexpensive tool is one of the biggest time-savers.
Precision Tweezers
Tweezers help you make small adjustments before the glue dries. They’re especially useful for:
- Straightening crooked rhinestones
- Picking up specialty-shaped gems
- Removing misplaced stones
- Refining detailed areas

Sorting Tray
Opening multiple bags of rhinestones without a tray can quickly become frustrating.
A sorting tray keeps colors separated and makes it easier to pick up individual stones with your wax pencil. Many crafters eventually invest in storage containers with separate compartments, but a simple tray works perfectly when you’re just getting started.
Optional Acrylic Sealer
While not required, a clear acrylic sealer can help protect finished artwork from dust and occasional handling. Whether you should seal your project depends on how it will be displayed, and we’ll cover that in more detail later in this guide.
Beginner Shopping Tip: If this is your first project, don’t feel like you need every specialty tool available. A blank canvas, flatback rhinestones, quality glue, a wax pencil, tweezers, and a sorting tray are enough to create beautiful DIY rhinestone canvas art.
Best Glue for Rhinestones on Canvas
Choosing the best glue for rhinestones on canvas can make the difference between a project that lasts for years and one that begins losing rhinestones after a few weeks.
The ideal adhesive should:
- Dry clear
- Hold rhinestones securely
- Remain slightly flexible
- Resist yellowing over time
- Give you enough working time to make adjustments
Here’s a comparison of four popular options.
| Glue | Dries Clear | Flexible | Best For |
|---|---|---|---|
| Gem-Tac | ✓ | ✓ | Best overall for beginners |
| Aleene’s Jewel-It | ✓ | ✓ | Canvas and fabric projects |
| E6000 Fabri-Fuse | ✓ | ✓ | Strong, flexible hold |
| Fabric Fusion | ✓ | ✓ | Lightweight embellishments |
Gem-Tac
Best Overall
Gem-Tac is one of the most recommended adhesives for DIY rhinestone canvas art because it’s easy to use, dries crystal clear, and provides a reliable bond without becoming brittle.
Pros
- Strong hold
- Dries clear
- Beginner friendly
- Easy to reposition rhinestones before it sets
Cons
- Requires several hours to fully cure
Aleene’s Jewel-It
Best for Fabric and Canvas
Designed specifically for attaching decorative gems, Jewel-It works well on canvas while remaining flexible after it dries.
Pros
- Made for rhinestones
- Clear finish
- Easy squeeze bottle
Cons
- Slightly longer drying time
E6000 Fabri-Fuse
Best Heavy-Duty Option
If you want an exceptionally strong bond without the strong fumes associated with traditional E6000, Fabri-Fuse is a great alternative. It works well for larger embellishments and mixed-media projects while remaining flexible after curing.
Pros
- Excellent durability
- Flexible bond
- Dries clear
Cons
- Longer curing time than some craft glues
Fabric Fusion
Best for Lightweight Projects
Fabric Fusion is another dependable option that performs well on canvas and dries with a flexible finish.
Pros
- Easy cleanup
- Flexible
- Clear finish
Cons
- Not quite as strong for larger or heavier rhinestones
Which Glue Should Beginners Choose?
If you’re buying your first bottle, Gem-Tac is the easiest recommendation. It offers an excellent combination of strength, flexibility, and ease of use, making it ideal for beginners learning how to create DIY rhinestone canvas art.
No matter which adhesive you choose, remember one simple rule: apply glue in small sections rather than across the entire canvas. Working a few inches at a time gives you plenty of time to position each rhinestone neatly before the glue begins to dry.
From here, you’re ready to start creating your design. In the next section, we’ll walk through how to make DIY rhinestone canvas art step by step, from choosing a design to placing the final sparkling details.

How to Make DIY Rhinestone Canvas Art (Step-by-Step)
Now that you’ve gathered your supplies, it’s time for the fun part—bringing your design to life. Whether you’re creating a simple floral pattern or an intricate piece of wall art, the same basic process applies. The key is to work slowly, stay organized, and enjoy the creative process.
If this is your first DIY rhinestone canvas art project, don’t worry about making it perfect. Like any new craft, your confidence will grow with each piece you create.
Step 1: Choose or Create Your Design
Every beautiful piece of rhinestone canvas art starts with a design. This is where you can let your creativity shine.
If you’re new to the craft, begin with a simple image that has bold outlines and larger sections to fill. Intricate details can always come later as your skills improve.
Some beginner-friendly design ideas include:
- Hearts
- Butterflies
- Flowers
- Rainbows
- Monograms
- Cherries
- Stars
- Inspirational words or short quotes
If you aren’t comfortable drawing freehand, there are several easy ways to create your design:
- Print a coloring page and trace it onto your canvas.
- Use a stencil for clean, crisp shapes.
- Sketch lightly with a pencil.
- Paint a simple background first, then add rhinestones once it dries.
- Project an image onto the canvas and trace the outline.
Tip: Avoid tiny details on your first project. Larger shapes are easier to fill and create a polished finished piece.

Step 2: Prepare Your Canvas
Before opening your rhinestones or glue, spend a few minutes preparing your workspace and canvas.
Start by making sure the canvas is clean and free of dust. If necessary, gently wipe it with a dry microfiber cloth.
If you’re transferring a design, lightly sketch or trace it onto the canvas using a pencil. Keep your lines faint so they won’t show between the rhinestones.
Next, organize your materials.
A little preparation now makes the entire project much more enjoyable.
Arrange your supplies so they’re within easy reach:
- Canvas
- Flatback rhinestones
- Glue
- Wax pencil or rhinestone picker
- Tweezers
- Sorting tray
- Paper towel for quick cleanup
Many experienced crafters also sort rhinestones by color before they begin. This simple step saves time and makes it much easier to stay focused once the glue is applied.

Step 3: Apply the Glue
One of the most common beginner mistakes is applying too much glue at once.
Instead, work in small sections about 2–3 inches wide.
Using a fine-tip bottle or small craft brush, spread a thin, even layer of adhesive only where you’ll be placing rhinestones over the next few minutes.
Working in sections offers several advantages:
- The glue won’t dry before you’re ready.
- You can adjust your design as you go.
- Mistakes are easier to fix.
- You’ll maintain straighter rows and cleaner edges.
If you’re using Gem-Tac, you’ll have enough working time to reposition rhinestones before the adhesive begins to set, making it an excellent choice for beginners.
Less is more. Too much glue can squeeze up around the rhinestones and reduce the sparkle of your finished artwork.

Step 4: Place the Rhinestones
Now it’s time to watch your artwork come to life.
Use a wax pencil or rhinestone picker to lift one rhinestone at a time and gently press it into the glue.
Work methodically across each glued section instead of jumping around the design. This helps keep spacing consistent and prevents accidentally resting your hand in wet glue.
As you place the rhinestones:
- Keep rows as even as possible.
- Leave consistent spacing between stones.
- Rotate specialty shapes so they face the same direction.
- Check your design from different angles every so often.
Don’t worry if a rhinestone isn’t perfectly placed the first time.
Simply use your tweezers to slide it into position before the glue dries.

Create More Dimension
One of the advantages of DIY rhinestone canvas art is that you aren’t limited to one size or finish.
For extra visual interest, try combining:
- Small and large rhinestones
- Matte and iridescent finishes
- Round and specialty shapes
- Metallic accents
- Pearl embellishments
These small variations can make your finished artwork look more professional and catch the light in beautiful ways.
Step 5: Fill in the Details
Once the larger sections are complete, step back and look over your design.
This is the perfect time to:
- Fill small gaps.
- Straighten crooked rhinestones.
- Add accent colors.
- Replace any damaged stones.
- Refine edges.
Many crafters find that these finishing touches make the biggest difference in the overall appearance of the artwork.
If you’re creating flowers, for example, consider adding a few iridescent rhinestones in the center of each bloom for extra sparkle.
For abstract designs, mixing finishes throughout the canvas creates more depth and movement.
Take your time during this step. Careful attention to detail often separates a good project from one that truly stands out.
Step 6: Let Everything Dry
Resist the temptation to move or hang your artwork immediately.
Allow the glue to dry according to the manufacturer’s instructions before handling the canvas.
Most craft adhesives become tack-free within a few hours but require 24 hours or longer to fully cure.
While your artwork dries:
- Keep it on a flat surface.
- Avoid touching the rhinestones.
- Protect it from dust and pet hair.
- Keep children and pets away from the project.
Once the adhesive has completely cured, gently inspect your canvas.
Press lightly on a few rhinestones to make sure they’re securely attached. If you notice any loose pieces, simply add a small amount of glue and reposition them before displaying your artwork.

Quick Success Tips for Beginners
Before you start your next project, keep these simple tips in mind.
✔ Work in small sections instead of covering the entire canvas with glue.
✔ Sort rhinestones by color before you begin.
✔ Keep a pair of precision tweezers nearby for quick adjustments.
✔ Wipe excess glue away immediately with a damp cloth.
✔ Step back occasionally to check your design from a distance.
✔ Allow the glue to cure completely before moving your canvas.
✔ Save leftover rhinestones—you’ll almost certainly use them in future projects.
These small habits will make your DIY rhinestone canvas art projects easier, less frustrating, and more enjoyable from start to finish.
In the final part of this guide, we’ll cover how to seal rhinestone art, common beginner mistakes to avoid, answers to frequently asked questions, and a few final tips that will help your finished artwork stay beautiful for years to come.
How to Seal Rhinestone Art
Once you’ve finished your masterpiece, you may wonder if you should seal it before displaying it. The answer depends on how you plan to use your artwork.
For most rhinestone canvas art displayed indoors, sealing isn’t always necessary. If you’ve used a high-quality adhesive and the rhinestones are securely attached, your artwork can last for years without an additional protective coating.
However, there are situations where learning how to seal rhinestone art is worth the extra step.
When You Should Seal Rhinestone Art
Consider sealing your project if you plan to:
- Display it in a high-traffic area
- Give it as a handmade gift
- Transport it frequently
- Store it for seasonal decorating
- Add extra protection against dust and moisture
When You Can Skip It
You may not need a sealer if:
- Your rhinestones are firmly attached.
- The artwork will hang indoors.
- You want to preserve the maximum sparkle.
- The piece won’t be handled often.
One thing to remember is that some sealers can slightly reduce the shine of your rhinestones. If sparkle is your top priority, it’s perfectly fine to leave the artwork unsealed.
Best Sealers for Rhinestone Art
If you decide to protect your project, choose a clear acrylic sealer designed for crafts.
Popular options include:
- Acrylic spray sealer
- Brush-on acrylic sealer
- Crystal-clear protective finish
Look for products that:
- Dry clear
- Don’t yellow over time
- Are non-toxic when possible
- Won’t leave a cloudy finish
Matte vs. Gloss Sealer
Choosing the right finish depends on the look you’re after.
| Finish | Best For |
|---|---|
| Gloss | Maintains a brighter, more reflective appearance. |
| Matte | Softens surrounding surfaces but may slightly reduce sparkle. |
Most crafters prefer a clear gloss finish because it protects the artwork while allowing the rhinestones to remain vibrant.
How to Apply a Sealer
If you’re using a spray sealer:
- Allow the glue to cure completely.
- Place the canvas on a protected surface in a well-ventilated area.
- Hold the can about 10–12 inches away.
- Apply several light coats instead of one heavy coat.
- Allow each coat to dry before adding another.
Thin, even coats produce the best results and help prevent pooling around the rhinestones.
Common Beginner Mistakes to Avoid
Every crafter makes mistakes when learning a new hobby. Fortunately, most are easy to avoid once you know what to look for.
Using Too Much Glue
More glue doesn’t create a stronger bond.
In fact, excess glue can seep around the rhinestones, creating a messy finish and reducing their sparkle.
Instead, apply a thin layer only where you’ll be working over the next few minutes.
Working on Too Large an Area
It’s tempting to spread glue across the entire canvas.
Unfortunately, by the time you reach one side, the glue on the other may already be drying.
Working in small sections keeps the adhesive fresh and gives you more time to adjust each rhinestone.
Choosing the Wrong Rhinestones
Not all rhinestones are made for canvas art.
Be sure you’re purchasing flatback rhinestones, which are designed to be glued onto flat surfaces.
Pointed-back rhinestones are intended for jewelry settings and won’t adhere properly.
Ignoring Your Layout
Before gluing anything permanently, step back and look at your design.
Checking the overall layout helps you spot uneven spacing or color imbalances while they’re still easy to fix.
Rushing the Drying Process
Patience pays off.
Moving the canvas before the adhesive has fully cured can shift rhinestones out of place or weaken the bond.
When in doubt, leave your artwork overnight before handling it.
Forgetting to Save Leftover Rhinestones
Don’t throw away the extras.
Store leftover rhinestones by color in small containers or labeled bags. They’ll come in handy for future projects, repairs, or adding decorative accents later.
Quick Tip Box
For the best results:
- Work in good lighting.
- Keep your hands clean.
- Sort rhinestones before you begin.
- Use quality glue.
- Take your time.
- Enjoy the process.
Small improvements in your technique quickly add up to beautiful finished artwork.
Frequently Asked Questions
Can beginners make DIY rhinestone canvas art?
Absolutely! DIY rhinestone canvas art is one of the easiest crafts for beginners because it doesn’t require advanced drawing or painting skills. Start with a simple design, work in small sections, and focus on learning the process rather than making everything perfect. As your confidence grows, you can move on to larger canvases and more detailed designs.
What’s the Difference Between Rhinestone Canvas Art and Bedazzling?
While both crafts use rhinestones, they serve different purposes. Rhinestone canvas art involves creating an original piece of artwork on a blank canvas using flatback rhinestones and adhesive. You design the image yourself, whether it’s a floral bouquet, butterfly, abstract pattern, or inspirational quote.
Bedazzling, on the other hand, is the process of decorating or embellishing an existing object with rhinestones. Instead of creating artwork from scratch, you’re adding sparkle to items like clothing, shoes, tumblers, phone cases, hats, or handbags.
In short, rhinestone canvas art is about creating original artwork, while bedazzling is about decorating an existing item. Both use similar materials, but the finished projects and creative goals are different.
What is the best glue for rhinestones on canvas?
Gem-Tac is one of the most popular choices because it dries clear, creates a strong bond, and gives you enough working time to adjust rhinestones before it sets. Aleene’s Jewel-It, Fabric Fusion, and E6000 are also excellent options depending on your project and the type of rhinestones you’re using.
Can you paint a canvas before adding rhinestones?
Yes. Many crafters paint a background before applying rhinestones to create more colorful or dramatic designs. Just be sure the paint is completely dry before adding glue and rhinestones so everything adheres properly.
Can you frame rhinestone canvas art?
Yes. Framing your finished artwork is a great way to protect it from dust while giving it a polished, finished appearance. Shadow box frames are especially useful because they provide extra depth without pressing against the rhinestones.
How long does rhinestone canvas art last?
With quality supplies and proper care, rhinestone canvas art can last for many years. Keep your artwork indoors, away from excessive moisture and direct sunlight, and avoid frequent handling to help preserve the adhesive and sparkle.
Should you seal rhinestone art?
Not always. If your artwork will be displayed indoors and the rhinestones are securely attached, sealing is optional. However, if the piece will be handled frequently or displayed in a high-traffic area, applying a clear acrylic sealer can provide additional protection.
Creating your own DIY rhinestone canvas art is a rewarding way to combine creativity with a little sparkle. Whether you choose a simple floral design, a personalized monogram, or a bold abstract pattern, each project gives you the opportunity to create something that’s uniquely yours.
As you’ve seen throughout this guide, you don’t need expensive equipment or advanced artistic skills to get started. With a blank canvas, flatback rhinestones, the right adhesive, and a little patience, you can create beautiful handmade décor that’s perfect for your home or to give as a thoughtful gift.
Remember, your first project doesn’t have to be perfect. Every canvas teaches you something new, and each one helps build the confidence to try more detailed designs in the future.