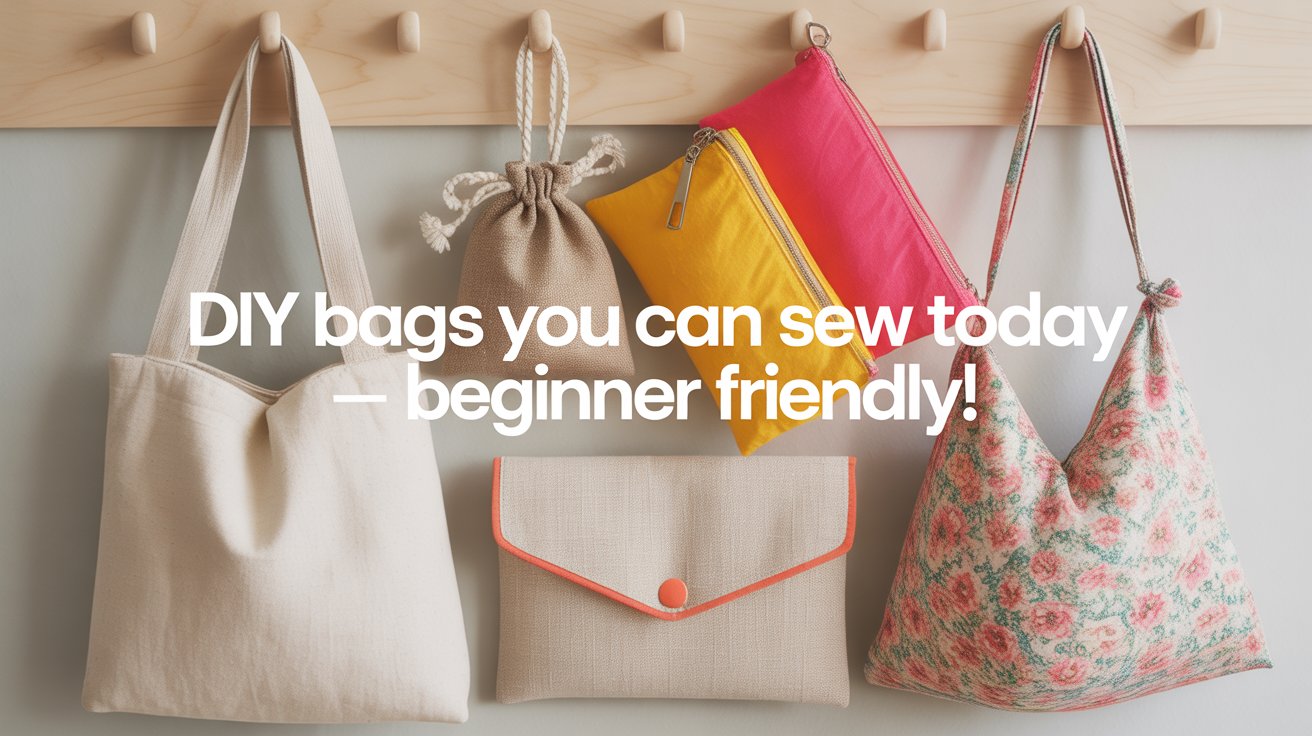
If you’ve been wanting to try sewing but don’t know where to begin, bags are one of the best starter projects. They’re simple, functional, and forgiving…no complex fitting required. Even as a total beginner, you can sew something that looks polished and useful. These 8 beginner bag patterns use basic stitches and easy shapes, yet each project looks fresh and stylish.
1. Flat Tote Bag

There’s something so satisfying about making a bag you’ll actually use every day. A simple handmade tote has endless potential—it’s practical, stylish, and gives you that little spark of “I made this.” The best part? Once you know the steps, you can whip one up in an afternoon and customize it in endless ways. Think of it as the perfect blend of function and creativity.
Materials Needed
- Medium-weight cotton or canvas
- All-purpose thread
- Ribbon, cotton webbing, or fabric strips for straps
- Sewing machine
- Iron
- Scissors or rotary cutter
- Pins or clips
Step-by-Step
1. Cut the Fabric
Cut two identical rectangles from your chosen fabric. A good starting size is 16″ x 18″, but you can adjust depending on how big you want your tote.
2. Sew the Sides and Bottom
Place the two rectangles right sides together. Sew along both sides and the bottom with a 1/2″ seam allowance, leaving the top open.
3. Finish the Top Edge
Fold the raw top edge inward about 1/2″, press with an iron, then fold over again another 1/2″. Stitch all the way around to create a clean finish.
4. Make and Attach the Straps
For straps, you can use ribbon, cotton webbing, or sew your own fabric strips. Standard length is around 22″ long, but feel free to adjust for shoulder or hand carry. Pin straps to the inside of the top edge, about 4″ from each side seam, making sure they aren’t twisted. Sew securely in place with a reinforced stitch.
5. Optional: Box the Corners
If you’d like your tote to have more depth, flatten each bottom corner and sew across about 2″ from the tip, then trim. This gives the bag a flat base.
And that’s it—your very own handmade tote. Once you make one, it’s impossible to stop. They sew up quickly, look chic in any fabric, and make the sweetest gifts for friends. Think farmers’ market mornings, library runs, or just tossing in your daily essentials. You’ll reach for this bag again and again.
2. Drawstring Pouch

A tiny handmade pouch that’s perfect for storing jewelry, gifting small treats, or keeping little essentials organized. Quick to sew, customizable in fabric, and charming to use, it’s the kind of project that’s both practical and delightful.
Materials Needed
- Lightweight cotton or linen
- Satin ribbon or cotton cord
- Sewing machine or hand needle
- Scissors or rotary cutter
- Pins
Step-by-Step
1. Cut the Fabric
- Cut two identical squares of fabric. The size depends on how big you want your pouch to be (for example, 6″ x 6″).
2. Sew the Sides
- Place the fabric squares right sides together.
- Sew along the two sides and the bottom, leaving the top open.
3. Make the Casing
- Fold the top edge down twice (about ½”) to create a casing for the drawstring.
- Press and stitch all around the casing.
4. Add the Drawstring
- Thread your ribbon or cord through the casing and knot the ends.
- Pull the cord to close the pouch.
And just like that, you have a charming drawstring pouch—small, functional, and handmade. Swap fabrics and ribbons to make it your own.
3. Boxed Bottom Tote

Take your everyday tote to the next level with a flat, boxed bottom that gives extra room and structure. It’s perfect for groceries, library trips, or carrying everything you need in style. Quick to make and surprisingly satisfying, this little detail makes a simple tote feel polished and professional.
Materials Needed
- Heavy cotton canvas or duck cloth
- Strong thread
- Cotton webbing or leather straps
- Sewing machine
- Scissors or rotary cutter
- Pins or clips
- Iron
Step-by-Step
1. Sew the Basic Tote
- Follow your standard tote instructions: sew the sides and bottom, leaving the top open, and attach your straps.
2. Pinch the Bottom Corners
- Turn the tote right side out. Pinch each bottom corner so that the side seam lines up perfectly with the bottom seam.
3. Stitch Across the Corners
- Sew straight across each corner, 2–3 inches from the tip. This creates the “boxed” shape.
4. Trim Excess Fabric
- Carefully trim any extra fabric beyond the seam to finish the flat corner.
And just like that, your tote now has a structured, roomy bottom that stands on its own and carries more without sagging. Choose sturdy canvas or duck cloth for durability, and watch this simple addition transform your handmade bag.
4. Envelope Clutch

A sleek, handmade envelope clutch is the perfect project when you want something stylish and compact. Ideal for evenings out, gifting, or keeping essentials together in your bag, this clutch is simple to sew and endlessly customizable. With clean lines and a crisp finish, it feels polished without feeling fussy.
Materials Needed
- Medium-weight cotton, canvas, or faux leather
- Coordinating thread
- Magnetic snap closure
- Sewing machine or hand needle
- Scissors or rotary cutter
- Pins or clips
- Iron
Step-by-Step
1. Cut Your Fabric
- Cut a rectangle for the body of the clutch. A common size is 12″ wide by 8″ tall.
2. Fold and Pin
- Fold the top edge down to create the envelope flap, about one-third of the height.
- Pin along the sides if needed to hold the shape.
3. Sew the Sides
- Stitch the side seams, leaving the top flap open. Backstitch at the beginning and end of each seam for durability.
4. Add the Magnetic Snap
- Mark the position for the snap on both the flap and the body of the clutch.
- Use a small craft knife or scissors to create tiny holes for the snap prongs.
- Insert the prongs through the fabric and bend them flat on the inside.
- Optionally, place a small piece of scrap fabric behind the prongs for extra stability and stitch in place.
5. Finish the Edges
- Press the clutch carefully with an iron to crisp the edges.
- Topstitch around the flap if desired for a polished look.
Voila! It’s done. Choose different fabrics, textures, and closures to make it uniquely yours. It works beautifully as a gift or as a stylish, functional addition to add to your own collection.
5. Simple Zipper Pouch

A simple zipper pouch is perfect for storing makeup, pens, small accessories, or keeping your bag organized. Quick to sew, practical, and stylish, it’s a great project for beginners and experienced makers alike. Choose fun fabrics to give each pouch personality.
Materials Needed
- Quilting cotton or canvas for the exterior
- Cotton fabric for the lining
- Standard zipper (length depends on your pouch size)
- All-purpose thread
- Sewing machine or hand needle
- Scissors or rotary cutter
- Pins or clips
- Iron
Step-by-Step
1. Cut the Fabric
- Cut two rectangles from your exterior fabric and two matching rectangles from your lining fabric. A common size is 9″ x 6″.
2. Prepare the Zipper
- Place the zipper face down along the top edge of one exterior rectangle.
- Lay a lining rectangle on top, right sides together, sandwiching the zipper. Pin along the edge.
- Repeat for the other side of the zipper with the remaining fabric pieces.
3. Assemble the Pouch
- Open the zipper halfway. This allows you to turn the pouch right side out later.
- Place the exterior pieces right sides together and the lining pieces right sides together.
- Pin around the sides and bottom, leaving the zipper area free.
4. Sew the Pouch
- Stitch around the sides and bottom with a 1/4″ seam allowance. Backstitch at the beginning and end.
- Clip the corners to reduce bulk.
5. Turn and Press
- Pull the pouch through the open zipper to turn it right side out.
- Press the seams with an iron for a crisp, polished finish.
Pick your favorite fabrics, mix patterns, and add personality. It’s a small project that makes a big style statement.
6. DIY Everyday Tote Bag

Want a tote that’s practical and pretty without the fuss? This one is simple, sturdy, and instantly elevates every errand run or coffee date. It’s roomy, durable, and so easy to sew you’ll want one in every print. Keep reading for the step-by-step guide to making your own — a project that feels polished yet approachable, with results you’ll actually love to use.
Note: You’ll see a few Optional steps in the instructions. These are purely upgrades (like adding a contrasting lining for extra polish or boxed corners for more depth). If you skip them, you’ll still end up with a perfectly functional and beautiful tote.
Materials Needed
- Medium-weight cotton or canvas
- (Optional) Contrasting cotton for lining
- All-purpose thread
- Ribbon, cotton webbing, or fabric strips for straps
- Sewing machine
- Iron
- Scissors or rotary cutter
- Pins or clips
Step-by-Step
1. Cut Your Fabric
- Cut two identical rectangles from your chosen main fabric (16″ x 18″ is a great starting size, but adjust to preference).
- (Optional upgrade: Cut two matching rectangles from a contrasting cotton if you want a lining.)
2. Sew the Bag Body
- Place the two main fabric rectangles right sides together.
- Stitch along both sides and the bottom with a 1/2″ seam allowance, leaving the top open.
- Press seams open with an iron for a neat finish.
- (Optional upgrade: Repeat this process with your lining fabric to create a neat interior.)
3. Finish the Top Edge
- Fold the raw top edge inward about 1/2″, then fold again another 1/2″.
- Stitch all the way around for a clean finish.
- (Optional upgrade: If adding lining, place the lining inside the bag, wrong sides together, and finish both layers together at the top edge.)
4. Make and Attach the Straps
- For straps, use ribbon, cotton webbing, or sew your own fabric strips. Standard length is around 22″, but adjust for shoulder or hand carry.
- Pin straps to the inside of the top edge, about 4″ from each side seam, making sure they aren’t twisted.
- Sew securely in place with a reinforced stitch (a box or “X” shape works well).
5. Optional: Box the Corners
- For a tote with more depth, flatten each bottom corner and sew across about 2″ from the tip.
- Trim excess fabric to reduce bulk. This creates a flat base that helps the tote stand on its own.
Result: With or without the optional lining and boxed corners, you’ll have a sturdy, stylish tote bag you’ll be proud to carry or even give as a gift.
6. Reversible Market Bag

A reversible market bag is practical, versatile, and a little fun. Perfect for grocery runs, farmers’ markets, or carrying everyday essentials, it flips inside out for a fresh look whenever you want. Easy to sew and sturdy enough for daily use, it’s a project that’s both functional and satisfying to make.
Materials Needed
- Medium-weight cotton or canvas for the exterior
- Coordinating fabric for the lining (medium-weight cotton works well)
- All-purpose thread
- Sewing machine or hand needle
- Scissors or rotary cutter
- Pins or clips
- Iron
Step-by-Step
1. Cut Your Fabric
- Cut two identical rectangles from the exterior fabric and two from the lining fabric. A good starting size is 16″ wide by 18″ tall.
2. Sew the Bag Bodies
- Place each pair of rectangles right sides together.
- Stitch along the sides and bottom with a 1/2″ seam allowance.
- Press seams open for a neat finish.
3. Make the Handles
- Cut four strips for handles, about 22″ x 2″ each.
- Fold each strip lengthwise with right sides together, sew along the long edge, then turn right side out.
- Press and topstitch along both edges for a polished look.
4. Attach the Handles to the Exterior
- Place the handles inside the exterior bag body, aligning raw edges with the top edge of the bag, about 4″ from each side seam.
- Make sure the handles are not twisted.
- Baste the handles in place. Keep the lining bag body wrong side out for now.
5. Assemble the Reversible Bag
- Slide the exterior bag inside the lining bag so that the right sides are together and the handles are tucked inside.
- Align the top edges and side seams, then pin all the way around.
6. Sew the Top Edge
- Stitch around the top edge with a 1/2″ seam allowance, leaving a small opening (about 3–4″) for turning the bag right side out.
7. Turn the Bag Right Side Out
- Carefully pull the exterior bag through the opening to turn the bag right side out.
- Push out corners gently and smooth the handles so they lie flat.
8. Finish the Top Edge
- Press the top edge with an iron for a crisp finish.
- Topstitch all the way around the top, closing the opening used for turning and giving the bag a polished look.
Your reversible market bag is ready. Flip it inside out for a fresh look and carry everything you need in style.
7. Fold-Flat Grocery Bag
Keep your shopping trips simple and stylish with a fold-flat grocery bag you can grab and go. Strong enough to hold all your groceries but lightweight enough to store anywhere, this bag is all about convenience without sacrificing charm. It’s quick to sew, easy to use, and designed to make everyday errands feel just a little more effortless.
Materials Needed
- Medium-weight cotton or canvas for the exterior
- Coordinating cotton for the lining (optional for extra durability)
- All-purpose thread
- Sewing machine or hand needle
- Scissors or rotary cutter
- Pins or clips
- Iron
Step-by-Step
1. Cut the Fabric
- Cut one large rectangle for the exterior. A good starting size is 18″ wide by 16″ tall.
- If using a lining, cut the same size rectangle from lining fabric.
2. Prepare the Handles
- Cut two strips for handles, about 22″ x 2″ each.
- Fold each strip lengthwise with right sides together, stitch along the long edge, turn right side out, press, and topstitch both edges.
3. Attach the Handles
- Lay the exterior rectangle right side up.
- Position each handle along the top edge, about 4″ from the side seams, with the raw edges aligned.
- Pin and baste handles in place. If using a lining, the handles can be sandwiched between the exterior and lining for a cleaner finish.
4. Sew the Sides and Bottom
- Place the lining rectangle (if using) on top of the exterior, right sides together, sandwiching the handles if needed.
- Pin along the sides and bottom.
- Stitch around the sides and bottom with a 1/2″ seam allowance.
5. Create the Boxed Bottom (Optional)
- To give the bag extra depth, pinch each bottom corner so the side seam lines up with the bottom seam.
- Sew straight across 2–3 inches from the tip and trim excess fabric.
6. Turn the Bag Right Side Out
- Pull the bag through the top opening.
- Push out corners gently and smooth the handles.
7. Fold-Flat Feature
- Press the top edge for a crisp finish.
- To fold flat, tuck the sides in and flatten the bottom. It fits easily in a drawer or tote for on-the-go use.
Your fold-flat grocery bag is done and ready for anything. Pack it full, carry it on your shoulder, or fold it down and stash it until your next adventure. Simple and practical, it’s a bag that makes every day errands feel a little more effortless.
7. DIY Fold-Flat Grocery Bag
This fold-flat grocery bag is practical, sturdy, and easy to store. Perfect for quick shopping trips, farmers’ markets, or carrying everyday items, it folds down neatly when not in use and pops open in seconds when you need it. It’s straightforward to sew and built to last.
Materials Needed
- Medium-weight cotton or canvas for the exterior
- Coordinating cotton for the lining (optional for extra durability)
- All-purpose thread
- Sewing machine or hand needle
- Scissors or rotary cutter
- Pins or clips
- Iron
Step-by-Step
1. Cut the Fabric
- Cut one large rectangle for the exterior. A good starting size is 18″ wide by 16″ tall.
- If using a lining, cut the same size rectangle from lining fabric.
2. Prepare the Handles
- Cut two strips for handles, about 22″ x 2″ each.
- Fold each strip lengthwise with right sides together, stitch along the long edge, turn right side out, press, and topstitch both edges.
3. Attach the Handles
- Lay the exterior rectangle right side up.
- Position each handle along the top edge, about 4″ from the side seams, with the raw edges aligned.
- Pin and baste handles in place. If using a lining, the handles can be sandwiched between the exterior and lining for a cleaner finish.
4. Sew the Sides and Bottom
- Place the lining rectangle (if using) on top of the exterior, right sides together, sandwiching the handles if needed.
- Pin along the sides and bottom.
- Stitch around the sides and bottom with a 1/2″ seam allowance.
5. Create the Boxed Bottom (Optional)
- Pinch each bottom corner so the side seam lines up with the bottom seam.
- Sew straight across 2–3 inches from the tip and trim excess fabric.
6. Turn the Bag Right Side Out
- Pull the bag through the top opening.
- Push out corners gently and smooth the handles.
7. Fold-Flat Feature
- Press the top edge for a clean finish.
- Tuck the sides in and flatten the bottom. The bag folds compactly and slips easily into a drawer, tote, or car for storage.
Fold it flat, open it up, and it’s ready for groceries, errands, or carrying whatever you need that day. It’s a hardworking bag without any fuss.
8. Pillowcase Sling Bag

This pillowcase sling bag is roomy, casual, and easy to carry. It folds and drapes naturally across your shoulder, making it perfect for errands, a day at the park, or just keeping your essentials close. It’s quick to sew, beginner-friendly, and doesn’t require complicated construction.
Materials Needed
- Lightweight to medium-weight cotton or linen
- Coordinating thread
- Sewing machine or hand needle
- Scissors or rotary cutter
- Pins or clips
- Iron
Step-by-Step
1. Cut the Fabric
- Cut one large rectangle from your fabric. A good starting size is 36″ wide by 16″ tall. This gives plenty of room for the bag to hold items and drape naturally.
2. Fold and Sew the Body
- Fold the rectangle in half widthwise with right sides together, forming a 36″ x 8″ tube.
- Stitch along the long side and one short side using a 1/2″ seam allowance. Leave one short side open for the bag’s top.
- Press seams open.
3. Create the Strap
- The open short side will serve as the bag opening and handle. Fold the raw edge of the open side inward twice and press.
- Topstitch along the folded edge for a clean finish. This forms the strap that drapes over your shoulder.
4. Optional Bottom Depth
- To give the bag more structure, pinch each bottom corner so the side seam aligns with the bottom seam.
- Sew straight across about 2–3 inches from the corner tip and trim the excess fabric.
5. Finish the Bag
- Turn the bag right side out.
- Press lightly to smooth seams and shape the strap.
Sewing a bag is one of the best ways to build confidence as a beginner. Each of these simple projects uses straightforward steps while giving you something practical to show for your effort. Start with one pattern, enjoy the process, and soon you’ll have a handmade bag collection that reflects your creativity.